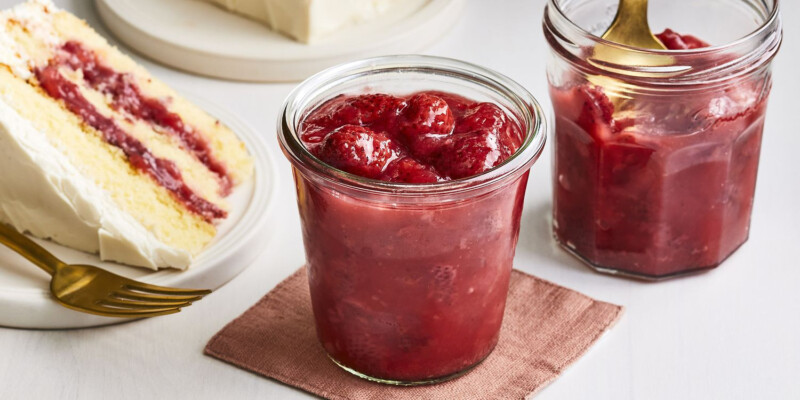
How to Make Delicious Strawberry Filling for Cake
Cakes are always a crowd-pleaser, but how to make strawberry filling for cake takes this classic dessert to the next level. The sweet, slightly tangy flavor of fresh strawberries makes for an irresistible filling. With just a few simple ingredients and steps, you can quickly whip up a luscious fruit filling perfect for layer cakes, cupcakes, ice cream sundaes, and more.
In this comprehensive guide, I will walk you through everything you need to know to make strawberry cake filling from scratch. We’ll go over why homemade strawberry filling is so delicious, the key ingredients and equipment required, step-by-step instructions for preparing the filling, essential tips for success, and creative ways to use this versatile fruit filling in all kinds of desserts and breakfast dishes. With my guidance, you’ll gain the skills to easily enhance your bakes with fresh, fruity strawberry cake filling anytime.
Why Make Your Own Strawberry Cake Filling
Before we dive into the how-to, let’s first look at why making DIY strawberry filling for cakes is so worth the minimal effort. Here are some of the biggest benefits:
Quick, Easy, and Fun to Make
This strawberry filling recipe comes together in just 15 minutes of active kitchen time. All you need is a pot, a few mixing bowls, and a spoon – no fancy equipment required. The cooking process is straightforward and hands-off, with just a few simple mixing and simmering steps. Making your own filling is an easy and enjoyable way to quickly take your cakes and cupcakes to the next level.
Delicious Fresh Strawberry Flavor
The delightful taste of juicy, ripe strawberries really shines through in homemade cake filling. Since there are no unnecessary additives, preservatives, or artificial flavors, you get pure, concentrated fresh fruit flavor in every bite. The sugar and lemon juice enhance the sweetness and tanginess of the strawberries beautifully.
Control Over Texture and Consistency
With store-bought frostings and fillings, you never know what consistency or texture you’ll end up with. By making DIY strawberry filling, you can customize the thickness to your exact preferences. Cook it a little less for a saucier filling, or longer for a thicker, spreadable consistency. The choice is yours!
Make It Any Time of Year
One of the great things about this strawberry cake filling recipe is that it works with both fresh and frozen strawberries. So even when fresh berries are out of season, you can still whip up a batch using frozen strawberries. Enjoy bright strawberry flavor in your desserts all year round!
Fun Flavor Variations
Once you master the basics, it’s easy to customize your homemade filling. Try adding a splash of balsamic vinegar or swapping in raspberries for new flavor twists. The possibilities are endless for inventing your own signature filling.
Better for Your Budget
Opting for homemade over store-bought filling is often much friendlier for your wallet. You likely already have most of the ingredients on hand. Making your own allows you to avoid expensive bakery or specialty store prices.
With all these benefits, it’s easy to see why taking just a few minutes to prepare fresh strawberry cake filling from scratch is completely worth it! The rest of this guide will equip you with everything else you need to know.
Essential Ingredients for Strawberry Filling
Making delicious strawberry cake filling doesn’t require a long list of ingredients. Here’s an overview of what you’ll need:
Fresh or Frozen Strawberries
The star of this filling, strawberries provide the delicious fruity flavor. You’ll need about 2 cups of diced strawberries. Go with fresh, ripe berries when they’re in season for best results. Or use thawed frozen strawberries any time of year.
Granulated White Sugar
About 1/2 cup of regular granulated sugar adds the sweetness needed to balance out the berries’ natural tartness. White sugar also helps thicken the filling.
Cornstarch
2-3 tablespoons of cornstarch (depending on how thick you want the filling) helps bind the ingredients and enables the filling to thicken to a spreadable consistency.
Water
A small amount of water (1/4 cup or so) provides the liquid base that will become the luscious filling once thickened.
Lemon Juice
A bit of freshly squeezed lemon juice (from about half a lemon) adds bright acidity that balances the sweetness and enhances the strawberry flavor.
With just these simple ingredients, you have everything you need for fresh, homemade cake filling.
Helpful Tools for Preparing Strawberry Filling
You don’t need any special equipment to whip up a batch of strawberry cake filling. However, having these basic kitchen tools on hand will make the process smoother:
- Small saucepan – For cooking the filling on the stovetop. A 2-quart size works well.
- Wooden spoon – For stirring the filling frequently as it cooks and thickens.
- Measuring cups and spoons – For accurately measuring out the ingredients.
- Mixing bowl(s) – For holding the sliced berries and mixing the cornstarch and water before cooking.
- Knife and cutting board – To slice and dice the fresh strawberries into smaller pieces.
- Potato masher or fork – To lightly mash some of the berries to release more juice.
- Rubber spatula – For scraping all the thickened filling out of the pan.
- Fine mesh strainer – To remove seeds, if desired. (Optional)
- Storage containers – Sealable jars, plastic containers, or zipper bags to store the cooled filling for later use.
As long as you have these basic kitchen tools, you’re ready to make homemade strawberry filling!
Step-by-Step Guide to Preparing Strawberry Cake Filling
Once you have your ingredients and tools, it’s time to start preparing your strawberry cake filling. Follow these easy steps:
Step 1 – Wash, Hull, and Dice the Strawberries
Start by giving the strawberries a thorough rinse under cool water. Remove the green stems and leaves from each berry. Then pat the strawberries dry thoroughly with paper towels or a clean dish towel. Dicing the berries into 1/4 to 1/2 inch pieces will allow them to cook evenly. Slice larger berries in half before dicing.
Step 2 – Make a Cornstarch Slurry
In a small bowl, whisk together the cornstarch and cold water until dissolved and smooth. This cornstarch slurry will help thicken the filling later.
Step 3 – Combine the Strawberries, Sugar, and Cornstarch Mixture
Add the diced strawberries and sugar to a medium saucepan. Pour the cornstarch slurry over the strawberries and stir to combine. Let this mixture sit for at least 15 minutes so the strawberries start releasing their juices.
Step 4 – Cook the Filling
Set the pan over medium-low heat. Stirring constantly with a wooden spoon, cook until the filling starts to bubble and become translucent. Then reduce heat and simmer for 2-3 minutes more until nicely thickened.
Step 5 – Stir in the Lemon Juice
Once thickened, remove the pan from the heat. Stir in the freshly squeezed lemon juice. This adds bright flavor and balances sweetness.
Step 6 – Let Cool and Store
Transfer the filling to a bowl and let cool completely, then seal and refrigerate until ready to use. The filling will thicken further as it cools. Store in the fridge for up to 1 week or freeze for up to 3 months.
And that’s it – you’ve made fresh, homemade strawberry cake filling from scratch! The whole process takes just 15 minutes of active cooking time. Now let’s go over some pro tips for success.
Tips and Tricks for Perfect Strawberry Filling
Follow these tips to help ensure your homemade strawberry cake filling turns out perfectly smooth, thickened, and flavorful:
- Use ripe, juicy berries when possible for the most flavor. Taste a berry – it should be sweet, not tart.
- Toss in a few slightly under-ripe berries, which contain more natural pectin to aid thickening.
- Mash about a cup of the berries with a fork or potato masher to release more juices.
- Stir the filling frequently as it cooks to prevent scorching on the bottom of the pan.
- Simmer on medium-low heat and don’t let the mixture boil, which could make the filling runny.
- Chill the filling completely before using, as it will continue thickening as it cools.
- For a smoother consistency, pass the cooked filling through a fine mesh strainer.
- Add a teaspoon of lemon zest along with the juice for an extra pop of flavor.
- Use granulated white sugar or berry sugar rather than brown sugar, which could discolor the pink hue.
Following these tips will help you achieve strawberry filling with the perfect lush texture and balanced sweet-tart taste every time.
Creative Ways to Use Strawberry Cake Filling
This versatile strawberry filling adds fruity flavor to so many desserts and breakfast dishes. Here are just a few ideas for using your homemade filling:
- Fill a layer cake by spreading the filling between cake layers of vanilla, chocolate, white, or even strawberry cake.
- Fill cupcakes through a hole poked in the top or sliced in half to sandwich the filling in the middle.
- Top pancakes, waffles, or French toast and drizzle with more filling for a fruity twist.
- Scoop over ice cream in a bowl for an easy strawberry sundae.
- Spread on crepes and roll up for a pretty presentation.
- Sandwich between cookies like shortbread or sugar cookies.
- Use as a dip for fried cheesecake bites or fruit.
- Swirl into yogurt, oatmeal, chia pudding or overnight oats.
- Top your cheesecake with filling rather than just strawberry preserves.
As you can see, the possibilities are nearly endless for ways to enjoy fresh strawberry cake filling. Let your imagination run wild!
Storing and Freezing the Strawberry Filling
Leftover strawberry cake filling keeps well in the fridge or freezer. Here are some storage guidelines:
- Place the cooled filling in an airtight container in the refrigerator for up to 1 week.
- For longer storage, spoon the filling into freezer bags or containers, seal, label, and freeze for up to 3 months.
- Thaw frozen filling overnight in the refrigerator before using.
- Don’t freeze pre-sliced strawberries more than 2 months, as they’ll lose texture.
With proper storage, you can enjoy homemade strawberry cake filling for months to come! No more wasting leftover filling.
Conclusion
I hope this detailed guide has equipped you with everything needed to start making luscious strawberry cake filling from scratch right at home. The sweet, tangy fresh fruit flavor it provides will bring your cakes and other desserts to the next level.
Prepared with just 5 simple ingredients and a few easy steps, whipping up a batch of DIY strawberry filling takes minimal effort while delivering maximum results. The filling also keeps well refrigerated or frozen.
So next time you bake a vanilla layer cake, make your own strawberry compote filling rather than using jam or preserves. You’ll be amazed at the difference in taste! I encourage you to try this easy filling recipe and get creative with adapting it to use in all kinds of sweet treats and breakfast dishes.
Let me know if you have any other questions as you venture into preparing your own strawberry filling for cakes. I’m happy to help you achieve sweet success!