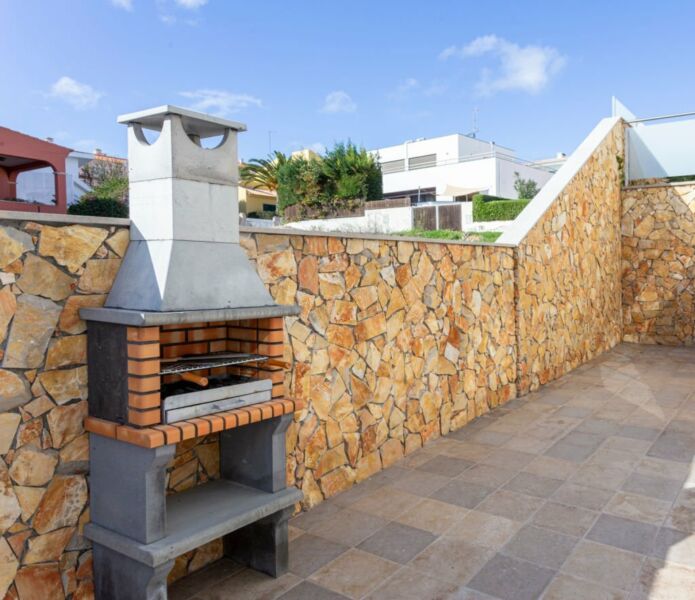
How to Build Your Own Brick BBQ with Chimney?
As the weather warms up, there’s nothing quite like firing up the BBQ and cooking a juicy steak or burger outdoors. But why settle for a plain metal grill when you can build your own custom brick BBQ that will become the highlight of your backyard? Constructing a sturdy brick BBQ with chimney allows you to cook over an open wood-burning fire, infusing your food with a wonderfully smoky flavor. While it may seem daunting, with the right materials and guide, a DIY brick BBQ is totally achievable for any motivated do-it-yourselfer.
In this comprehensive guide, I’ll walk you through the entire process of building a brick BBQ with chimney yourself, from laying the foundation to constructing the chimney. We’ll go over the necessary materials, tools, safety tips, and step-by-step instructions, so you can build a fully-functioning brick BBQ that will last for years. With strategic planning and a weekend or two of hard work, you can save money and enjoy the satisfaction that comes with completing a major DIY project. Let’s get started!
Step 1: Design Your Brick BBQ and Create Plans
The first step when undertaking any major construction project is proper planning and design. This ensures you accurately calculate the required materials and fully envision the end result. When designing your DIY brick BBQ:
- Decide on the size and layout – The dimensions depend on factors like yard space and number of people you plan to feed. A 4×4 foot design is a good medium size. Also determine the layout like whether you want L-shaped, rectangular etc.
- Choose a location – Pick a BBQ site that’s flat, has good drainage, and is safely away from trees and structures.
- Incorporate key elements – Must-haves include a grill, side counter, firebox, chimney, and fuel storage area.
- Sketch plans – Draw up outlines from a few angles to conceptualize the full structure. Having plans will make the building process smoother.
Doing the prep work ensures your DIY brick BBQ meets functional needs and building codes. Next, acquire the necessary permits if required by your local regulations. With the design complete, it’s time to gather materials.
Step 2: Obtain Construction Materials and Supplies
Building a brick BBQ yourself requires concrete, bricks, lumber, and other structural materials. Here’s an overview of what you’ll need:
- Concrete – To construct the foundation and counter, you’ll need concrete, sand, gravel, and rebar steel rods.
- Bricks – Standard clay bricks and high-heat firebricks. Calculate the numbers needed based on your design.
- Mortar – A mix of cement, lime, and sand to bind the bricks together. Use high-heat mortar for the firebox area.
- Lumber – Treated wood boards and posts are necessary for structural framing and creating concrete forms.
- Hardware – Galvanized steel anchors, ties, bolts, and angle brackets strengthen the structure.
- BBQ grill – Purchase a heavy-duty grill insert designed for masonry installation.
- Chimney flue – You’ll need high-temperature chimney pipes, caps, and flashing.
- Finishing touches – Consider stone or tile countertops, stucco coating, etc.
Make sure to buy all materials upfront. It’s no fun to halt construction halfway due to something forgotten! Safety gear like gloves, goggles, and a mask are also a must.
Step 3: Prepare the Site and Lay the Foundation
With your design planned and supplies ready, it’s time to start construction on your DIY brick BBQ. Proper site preparation and a strong foundation are crucial first steps. Here’s how it’s done:
- Mark the footprint using stakes and masonry string to visualize the BBQ layout.
- Excavate the site to about 8″ deep using a shovel and pickaxe. Level it off.
- Build a wood perimeter form using 2×4 or 2×6 lumber secured with reinforcement stakes.
- Add steel rebar rods inside for stability. Position them 2″ from the edges.
- Mix concrete per instructions and pour into form, slightly overfilling.
- Screed and smooth the surface using a straight 2×4. Let concrete fully cure before continuing.
This provides a solid base to stack the BBQ walls and chimney upon. The rebar integrates strength while the form keeps the liquid concrete in place until dry. With the foundation prepped, the real bricklaying can commence!
Step 4: Build the BBQ Base Walls with Bricks
Now for the fun part – constructing the main BBQ structure brick-by-brick. While it takes practice to master, bricklaying is straightforward once you get the hang of it. Follow these tips for properly stacking bricks:
- Mix up mortar in batches – combine cement, lime, sand and water to desired consistency.
- Begin by outlining the base perimeter with bricks on their sides. This anchors the walls.
- Apply a layer of mortar onto the foundation with a trowel.
- Lay the first row of bricks tight together lengthwise, using a level to ensure they’re even.
- Each new row should be staggered in a running bond pattern for stability.
- Use the handle-end of trowel to spread mortar atop bricks. Keep 1⁄4-1⁄2″ gaps between.
- Tap bricks gently with rubber mallet to set them in mortar evenly.
- Tool the mortar once bricks are laid using a concave profile. Smooth any globs before drying.
Work your way around the base, building upward in layers. Check your measurements and use string lines across corners to keep walls straight. Allow the mortar to fully cure before resuming. Get ready for sore arms and hands!
Step 5: Construct the Firebox and Smoker Area
The firebox is where you’ll build an open wood fire for fueling your DIY brick BBQ. High-heat firebricks withstand burning temperatures. To make the firebox:
- Determine size needed for fire capacity. Common dimensions are 16″x16″ or larger.
- Outline the area using typical bricks first. Leave an opening for accessing the firebox.
- Mix high-heat mortar and begin stacking firebricks inside the outline. Keep gaps tight.
- Create a shelf from firebricks to place logs on. Leave air gaps below for airflow.
- Angle the ceiling bricks inward slightly to prevent heat escaping upwards.
Adjacent to the firebox, construct an insulated smoker box, also lined with firebricks. The smoke circulates from firebox to smoker to flavor foods. Add grilling grates above both sections. Now your brick BBQ is ready for real cooking action!
Step 6: Build the Chimney
No outdoor BBQ is complete without a chimney for ventilating smoke. Position the chimney at the opposite end from prevailing winds. Here are tips for chimney construction:
- Determine needed interior diameter based on firebox size. 10”-12” is common.
- Stack standard bricks using high-heat mortar to form walls.
- Use a brick on its side in each row to create a smoke shelf.
- Place chimney pipe sections inside, sealing gaps with mortar.
- Extend the chimney above the BBQ roofline based on height regulations.
- Install rainproof chimney caps on both the top and bottom outlet.
The chimney draws air through the BBQ while expelling smoke vertically. Follow local codes for proper chimney sizing and height requirements.
Step 7: Add the Concrete Countertops
You’ll need ample countertop workspace for food prep and presentation when cooking on your DIY brick BBQ. Concrete makes a durable, heat-resistant surface. Follow these steps to complete it:
- Build a perimeter form using 2×4 lumber just like the foundation form.
- On top of the brick walls, level and compact gravel fill.
- Place steel rebar inside for strength. Rebar grids work great.
- Mix and pour concrete to fill the form. Overfill slightly.
- Once dry, smooth the surface with a concrete float for a flat finish.
- Coat the concrete with food-safe sealer to protect from stains.
- Optional: Add tile, stone veneer, or other overlays for decorative visual appeal.
Now you can chop ingredients and arrange cooked BBQ with ease on your custom countertop. Add some barstools and you’re set for outdoor culinary enjoyment!
Step 8: Install the BBQ Insert and Grates
No DIY brick BBQ is functional without a quality grill insert to cook on. Look for commercial-grade stainless steel models designed for masonry structures. Here’s how to install it:
- Make sure the insert dimensions fit the firebrick enclosure.
- Lower it in place and center evenly. The surrounding bricks should provide support.
- If needed, use non-combustible insulation to fill any gaps.
- Secure the insert grille with masonry bolts anchored into the bricks.
- Place heavy-duty cooking grates on top. These are often included with the insert.
- For extra stability, mortar the grill in place using high-heat mortar.
With your grill mounted, you can get straight to grilling everything from steaks to kebabs! Enjoy smoky backyard flavor all summer long.
Step 9: Stucco and Finish Exterior
Applying an exterior finish gives your homemade brick BBQ a sleek appearance and protects from weathering. Stucco is a classic finish for brick structures. Here’s how to apply:
- Mix stucco per instructions. Consider adding concrete tint to the mix for color.
- Apply stucco base coat with a trowel, completely covering the bricks.
- Let base coat dry completely before finishing layer.
- Mix finish coat stucco, adding acrylic fortifier for durability and sand for texture.
- Trowel finish coat over base. Use brush to create look of stone or brick.
- Consider adding trim details like rounded bullnose edges.
- Seal the finished stucco surface with an acrylic sealer.
Take time finishing the exterior – this protects your DIY investment for seasons of BBQing to come. Add a pergola or stone patio nearby to complete your backyard oasis!
Operating Your Brick BBQ Safely
Like any wood-fired structure, safety should be paramount when using your DIY brick BBQ. Follow these tips to prevent accidents:
- Keep the BBQ area clear of flammable items like paper or dried leaves.
- Check that the chimney flue is open before starting a fire.
- Use seasoned hardwoods rather than treated lumber or painted scraps.
- Don’t leave the BBQ unattended when in use.
- Ensure coals are fully extinguished before leaving.
- Keep a fire extinguisher and water hose nearby in case of emergencies.
- Avoid wearing flammable or flowing clothes when cooking over an open flame.
Treat your brick BBQ with respect, and always place safe operation as the number one priority. Taking key precautions allows everyone to have fun and eat well!
Maintaining Your DIY Brick BBQ
Like any outdoor structure, your homemade brick BBQ will need periodic maintenance. Follow these tips to keep it looking great:
- Inspect mortar joints and repoint as needed to prevent leaks.
- Clean the chimney yearly and clear any creosote buildup.
- Keep the grill interior cleaned by regularly brushing.
- Repair any chips or cracks in countertops or stucco.
- Cover the BBQ in winter to prevent weather damage if you live in cold climates.
- Consider applying fresh sealant to countertops and stucco every few years.
Don’t neglect repairs, or small issues can turn into major headaches later on. With proper care, your DIY brick BBQ can cook up meals for decades of backyard memories!
Tips for Success Building Your Own Brick BBQ
Constructing your own brick BBQ is incredibly rewarding, but also demands time and hard work. Keep these tips in mind for success:
- Have realistic expectations about the time and effort required. Rushing through steps can jeopardize quality.
- Follow the building codes for your area, like height regulations and material requirements.
- Wear protective gear like gloves and eye protection when handling concrete or mortar.
- Lifting and placing bricks all day can be taxing. Pace yourself, drink water, and rest when tired.
- Use extra care and precision when laying bricks, as sloppy work will haunt you later during operation.
- Research and prep all steps of the project in advance rather than playing it by ear.
By employing smart planning and patience throughout the process, you can enjoy your homemade brick BBQ for years of memorable backyard gatherings. Get ready to become the talk of the neighborhood!
Frequently Asked Questions About Building a Brick BBQ
How much will it cost to build a brick BBQ myself?
Budget approximately $2000-$3500 depending on BBQ size and materials selected. The bulk of costs come from concrete, bricks, lumber and the grill itself. Using recycled bricks saves money.
What tools do I need to build a brick BBQ?
Essential tools include a mallet, masonry trowel, spirit level, tape measure, wheelbarrow, shovel and saw. You’ll also need concrete mixing tools and a compactor. Consider renting items like a circular saw to save money.
How long does it take to build a brick BBQ?
Expect to spend at least two full weekends – potentially longer if working alone. Make sure to allow ample time for concrete and mortar curing between steps. Rushing the process leads to structural issues.
What maintenance does a brick BBQ require?
Expect to spend a few hours yearly checking for damage, cleaning the chimney and grill, and making minor repairs. Resealing the countertop every 2-3 years helps protect the surface. Overall, a brick BBQ requires minimal regular maintenance.
Can I use reclaimed bricks if building a BBQ myself?
Yes! Using reclaimed bricks lends character and saves money. Just inspect closely for chips or cracks that could affect durability and heat resistance. Matching mortar color to the old bricks also helps the BBQ look cohesive.
Is mortar necessary when stacking firebricks to make the firebox?
Special high-heat mortar should be used to stack firebricks, as it’s formulated to withstand intense temperatures. Mortar-free stacking risks bricks becoming misaligned or damaged during heating. Proper mortaring provides a safer build.
Conclusion
Building your own brick BBQ with chimney is an incredibly rewarding DIY project that will level up your outdoor cooking game. With strategic planning and a step-by-step approach, a weekend warrior can construct an impressive brick structure perfect for flipping burgers and impressing guests. Not only do you get to enjoy delicious wood-fired meals, but satisfaction from creating something with your own two hands. I hope these detailed plans give you the knowledge and inspiration to turn your backyard into the neighborhood hangout spot! Fire up that brick grill and get ready for some amazing summertime feasting.